Tutorial: Digital Still Cameras
Introduction
This tutorial covers principles of digital photography in general, but refers to these digital still Canon cameras as examples:
PowerShot G1, G5, Pro1, Rebel XT
If you have a different camera, you’ll find that the same functionality is present on your camera, though buttons and menus may be in places other than those shown here. Consult your owners’ manual.
About Digital Cameras
Digital still cameras store photographs as digital bits on a memory card or tiny hard drive, as opposed to the film used in traditional cameras.
Rather than developing and printing film, digital images can be downloaded easily to a computer. A photographer also can instantly review shots on an LCD (liquid crystal display) monitor built into the digital camera. The memory cards can hold a large number of images. After downloading the images to a computer, the flash cards can be erased for reuse.
The main drawbacks to digital still cameras are:
- A slight delay that occurs between clicking the camera’s shutter button and the camera actually taking the picture. The better the camera, the shorter this delay will be. Professional digital cameras do not suffer from this lag time, and the problem is becoming less pronounced even with cheaper consumer/pro-sumer cameras.
- A battery is required for operation, so you’ll need to periodically recharge it (this can be done by connecting the camera to an AC power adapter and charging the battery in the camera, or by purchasing a separate AC battery charger).
- Photos that are not quite as high quality as what you get with traditional single lens reflex (SRL) cameras, unless you purchase a very high-end (and expensive) digital camera. But even a mid-range digital camera produces photos that are suitable for the vast majority of purposes, including Web publishing.
SLR vs. Non-SLR
There are two basic kinds of digital cameras: Digital SLR (single lens reflex) and non-SLR. Digital SLRs are generally more expensive and more accurate than non-SLR cameras, and include more professional features.
SLR cameras — whether film or digital — use a system of mirrors to take the image coming through the lens and reflect it up into the eyepiece. Thus, what you see in the eyepiece is exactly what you get on the camera back, where the image is recorded. In contrast, the eyepiece on a non-SLR camera looks out through a separate hole at the top of the camera. As a result, what’s seen through the viewfinder is slightly different from what comes through the lens. What you see is not exactly what you get.
While we sometimes think of the ability to preview a shot as a hallmark of digital cameras, there is an interesting side-effect of using an SLR camera in the digital world: The mirror that reflects light from the lens up to the viewfinder blocks the digital image sensor on the camera back until the image is shot. Therefore, digital SLR cameras generally do not let you frame and preview your shot on an LCD screen before shooting — you must frame your shot in the viewfinder, as you would with a traditional SLR camera.
Here is an animation showing how SLR cameras work.
Here is an animation showing how non-SLR digital cameras work.
There are a few digital SLR cameras that have come up with clever workarounds for this problem, but most digital SLRs, including the Canon Rebel, do not allow for LCD preview.
In this tutorial, the Canon Rebel is a digital SLR with no LCD preview; all other cameras are non-SLR with LCD preview.
Batteries
A digital still camera is powered by a battery. A camera will have a compartment into which you insert the battery.
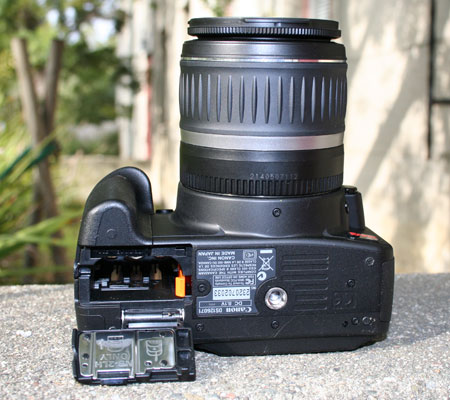
On the Canon Rebel, PowerShot G1 and G5, _the compartment is on the bottom of the camera. On the Pro1, the compartment is on the side. Push the button labeled BATT. OPEN in the direction of the arrow. Then to the right, place your thumb on the arrow and slide the battery compartment door to the right until it opens.
Swing open the door and insert the battery into the slots in the compartment, with the arrow on the battery pointing in.
Close the door, which will press the battery all the way into its slot, and slide the door to the left to lock the battery in the compartment.
To remove the battery, open the door and slide the small holding latch to the side. The battery will pop out.
Memory Cards
Digital still cameras can store images on a variety of different media types, such as SmartMedia, CompactFlash, and Sony’s MemoryStick. Some cameras even burn images to CD on the fly, or utilize small hard drives to store images. The CompactFlash format has emerged as the most popular storage media.
Flash cards come in different sizes measured in megabytes, such as 64 MB, 128 MB, 512 MB, 1GB, or 2GB. These cards can store hundreds of images at medium resolution (a resolution good enough for publication on a Web site).
How many images can fit onto a memory card? The answer to this question isn’t nearly as cut-and-dried as it with traditional film. Factors include:
- The capacity of the memory card
- The image resolution at which you choose to shoot
- The amount of “compression” applied to the stored images
For a rough sense of how many images can fit onto a 512MB Compact Flash card at a few of the above combinations, see the table below:
| Image storage capacity for 512 MB CF card | ||
| Resolution | Compression | Images |
| L format 3456 x 2304 | Fine | 137 |
| L format 3456 x 2304 | Medium | 277 |
| M format 2496 x 1664 | Fine | 237 |
| M format 2496 x 1664 | Medium | 452 |
| S format 1728 x 1152 | Fine | 410 |
| S format 1728 x 1152 | Medium | 780 |
| RAW @ 3456 x 2304 | None | 57 |
We’ll discuss resolution and compression in more detail later in this guide. Meanwhile, don’t be tempted to set your camera to the smaller formats and compression ratios just to squeeze more images onto a card. Memory cards and hard drives are cheap — even if you only intend to shoot for the web, you never know when the bureau chief might ask for a high resolution version for special purposes, or you decide you’d like to have a printable version. You can always remove data from an image, but you can’t restore data that was never there to begin with. For general purposes, we like to shoot at Medium format (2496 x 1664), Fine or Medium compression. Professional photographers use resolutions much higher than this.
Inserting the Memory Card
The camera will have a slot into which you insert the flash card, generally on the right side of the camera. Place your thumb on the black arrow on the slot labeled CF OPEN and slide the small door to the slot in the direction of the arrow.
Swing open the door and insert the CompactFlash card into the slot, with the label facing toward the camera back and the arrow on the card pointing in. Push the card gently until it snaps into place. Then close the door until it clicks into place.
If the card does not fit easily into the slot, do not force it. There are tiny pins inside the slot that can be bent or broken if a card is inserted forcefully.
To remove the card, repeat the steps above for opening the card slot and then press down on the button to the right of the slot to release the card.
Turning on the Camera
If your camera has a lens that extends automatically from the camera body, remove the lens cap from the front of the camera. This is important, because the camera lens will extend when the power is turned on. If it has to fight against the lens cap, the lens motor could be damaged.
Then use the dial on the camera to turn it on.
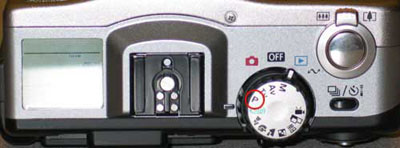
On the Canon Rebel, use the large On/Off switch at the top right of the camera body, to the right of the Mode Dial. On the Canon PowerShot G1, the dial is on the top right. Turn the outer ring of the dial from Off to the red camera icon.
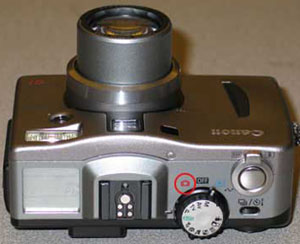
On the Canon PowerShot G5 and Pro 1, the power switch is the second dial from the right. With your thumb, move the dial to the red camera icon – it will flip back to its resting state afterwards, but the camera will be on.
Taking A Shot
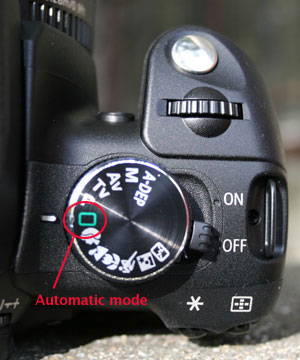
As described in the introduction, digital SLR cameras generally do not let you frame shots on the LCD screen, while non-SLR cameras do. Regardless which kind of camera you’re using, set the camera to fully automatic mode before beginning. On the Canon Rebel, turn the main Mode dial to the plain square icon. For the G1, G5, and Pro 1, turn the main mode dial to “Auto.” Automatic mode will cause the camera to set focus, aperture, and shutter speed settings automatically.
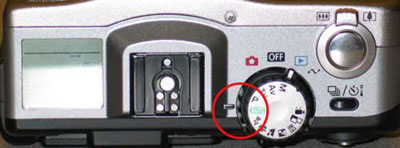
To set PowerShot cameras to auto focus and exposure, use the Mode dial on the top right of the camera. Turn the dial until the word AUTO (in green) lines up with the black line to the left of the dial. Automatic mode on the Rebel is indicated in the photo in the Power-On section above.
To take manual control of exposure and focus settings, see Other Settings.
Digital SLR: Use the viewfinder to frame your shot. In Automatic mode, the image should stay in focus as you move the camera. Twist the lens body to zoom in or out.
Non-SLR: Pull out the LCD screen from the back of the camera to see what the camera is framing for a shot. Alternatively, keep the LCD closed and look through the viewfinder on the back of the camera. Keep in mind that using the LCD screen will drain the battery more quickly. If you want to leave the LCD open but conserve battery power, tap the Display button on the back of the camera to temporarily turn it off.
The shutter button is almost always at the top right of the camera body, and is a large-ish button. To take a picture, press the shutter button on the top of the camera halfway down. Pressing the shutter button halfway tells the camera to set focus and exposure settings for the area inside one or more small rectangles seen in the viewfinder or on the LCD. You may also hear a beep or other sound from the camera, indicating that the camera is ready to shoot. This process is called pre-focusing.
When the rectangle(s) turn green, or a light flashes inside them, the camera has focused on and set exposure for the shot properly. Press the shutter button the rest of the way in to take the shot. While most modern cameras are fast enough to let you press the shutter button all the way down right away, without pre-focusing, it’s good practice to slow down and pre-focus first. You’ll get better results if both you and the camera have time to think about the composition of the shot.
Regardless the camera type, the new shot will appear on the LCD screen for two seconds (by default). This gives you a chance to review your shot before taking more, so you can make any necessary exposure or framing adjustments. If a shot comes out badly, you may want to delete it immediately, by pressing the trash can button on the camera (see Erasing Images). If you don’t want to wait two seconds, you can press the shutter button again to quickly take another shot. If you never want to wait two seconds, you can change this duration (or turn it off) in the camera’s menu.
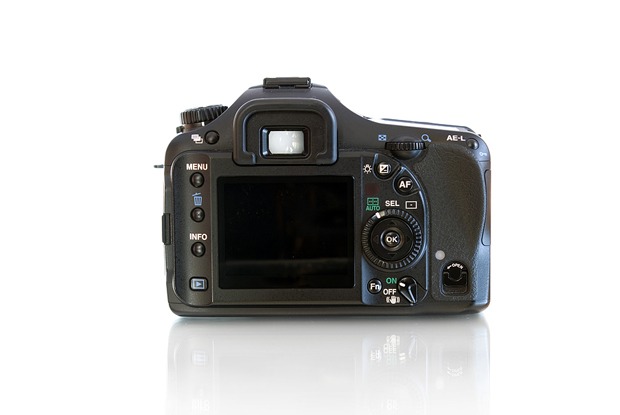
The number of pictures remaining on your flash card will be displayed in the smaller view window on the top left of the camera (on the Rebel, the Info window is below the viewfinder on the back, rather than on top of the camera).
Remaining battery life also is displayed in the Info window. If the battery icon is completely black, the battery is fully charged.
Quick Tour of the Canon Rebel
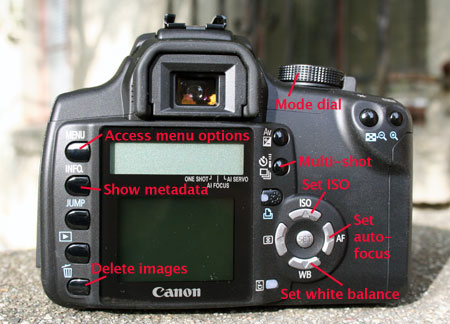
Basic functions of the Canon rebel. Most of these functions are covered elsewhere in this tutorial.
Menu Settings
Settings that might vary from one picture to the next are made with the various dials and buttons on the camera body. Other settings specific to general camera operations, such as resolution and compression of the photos, are changed through the camera’s menu, which is displayed on the LCD screen.
On Canon cameras, access the menu by pressing the button labeled MENU. The menu will be displayed in the LCD screen. On the Rebel, the Menu button is at the top left of the camera back. _
The layout of the menu is somewhat different for every camera, but they generally cover the same thing. Here we cover the menus for the PowerShot G2 and the Rebel.
Rebel Menu
The Rebel has a total of five menus: Two shooting menus, one playback menu, and two setup menus. Menus can be navigated either with the Main Dial (the plastic wheel/knob at the top right of the camera or with the arrow keys. Major sections of the menu can also be navigated with the Jump button. Pressing the middle SET button activates the current menu choice (you should generally think of the SET button like an OK button as you work with the camera).
The Shooting menus let you set things like image resolution, whether the camera should beep for confirmation when you do certain things, ISO speed, set “bracketing modes,” and adjust the white balance. The Playback menu lets you “lock” images, rotate them, and run a slideshow on the LCD. The Setup menus let you do things like set LCD brightness, set the timestamp, or format a CF card.
You can press the Info button on the back of the Rebel at any time to see a listing of all current camera settings. This makes it easy to see at a glance all of the menu options currently set or selected.
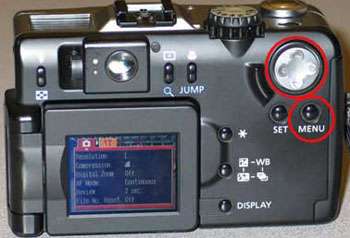
PowerShot G2 Menu
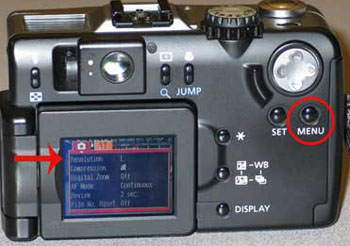
If you selected the G2’s menu while in picture taking mode, you’ll have a list of Rec Menu items (in red), which generally are settings for taking pictures.
If you selected the menu while in playback mode, you’ll have a list of Play Menu items (in blue), which are settings for displaying pictures you’ve already taken.
In both cases, you’ll see another menu list of Set up Menu items (in yellow), which generally are settings for the camera’s display screen.
To navigate in the menus use the Omni Selector button with four arrows that’s on the back top right of the camera.
Press the up or down arrows on the Omni Selector to move up or down within a menu.
Press on the right or left arrows on the Omni Selector to make selections within a menu item, or to move between the two possible general menus (Rec and Set Up or Play and Set Up).
In some menu items you may be asked to confirm an action (such as reformatting the flash card, which will prompt you to OK the action). In that case, used the left and right Omni Selector buttons and press the SET button on the back of the camera just to the left of the menu button to confirm the action. The SET button is the equivalent of saying “OK.”
To leave the menu, simply press the Menu button again.
Note: On the Canon PowerShot G5 and Pro1, you can reset all the Menu options to the default factory settings by pressing the Menu button and holding it in for five seconds. Then use the Omni Selector left and right buttons to select OK, and press the SET button. On the Rebel, select “Clear Settings” from the second Setup menu.
This will restore the camera to the settings we recommend, with the exception of the Resolution setting, which you’ll need to change to one of the middle settings using the Func button.
Resolution
You can change both the resolution and the compression level of the pictures you take with a digital camera. Resolution refers to the dimensions of the images as measured in pixels and compression refers to the amount of data used to describe the image.
Taken together, these two settings let you make trade-offs between image quality and file size. The smaller the filesize, the lower the quality and the more images you can fit onto a memory card, and vice versa.
In general, use higher quality settings when your destination is a print of any kind. For Web work, you can get away with lower quality settings (though the lowest quality is seldom recommended).
Common resolutions are:
- 3456 x 2304 – the best possible resolution on the Canon Rebel, not available on other cameras covered here. Using this resolution will dramatically reduce the number of shots you can fit on a card.
- 2592 x 1944 – the best possible resolution on the PowerShot G5, not available on the G1.
- 1024 x 768 – a middle ground that produces pictures with good enough resolution for use on a Web page, and allowing you to take a large number of pictures on a flash card.
- 640 x 480 – the lowest quality, which allows you to take the largest number of photos on a single flash card. This resolution is still be good enough in many cases for photographs being used on Web pages. Use this resolution only if caught in the field without an extra memory card.
Set the resolution from the Shooting menu. Press the camera’s MENU button and navigate to the Shooting tab, then down to the Resolution or Image Quality sub-menu.
On the PowerShot cameras, use the Omni Selector dial, the gray button with four arrows that’s on the back top right of the camera, to navigate through the menu. On the Rebel, the arrow keys work much like the Omni Selector. Press on the downward pointing arrow until the Resolution settings line is highlighted. Then press the right or left arrows to move between and select a resolution. For Web purposes, we recommend using a resolution of at least 1024×768. For print purposes, we recommend using a resolution of at least 2048 x 1564.
To retain the setting you’ve chosen and leave the menu, press SET and then the MENU button again.
Some cameras also let you access the image resolution directly, without going all the way through the menu system. On the PowerShot G5 and Pro1, set the resolution by pressing the FUNC button on the back of the camera. Then use the Omni Selector, the gray button with four arrows that’s on the back top right of the camera, to scroll down to the bottom entry in the list for resolution.
Compression
Digital cameras usually store pictures in JPEG format, which also happens to be the standard format for displaying images on the Web. The JPEG format allows you to change the compression of the pictures you take.
This setting offers another trade-off between the quality of the pictures and the number of pictures you’ll be able to fit on a single memory card. Compression discards some of the information in a digital photo (in effect some of the pixels) to reduce its size, while trying to retain enough of the information so the quality of the photo is still high.
Thus with higher compression, you’ll be able to take more photos on a memory card, but the quality of those pictures will be somewhat diminished.
Setting Compression on the Rebel
Both resolution and compression are set through the same interface on the Rebel (see Setting Resolution). Each image size on the menu is a row, and each row is comprised of two columns. Use the left column option for Fine compression at that size, or the right column option for Medium compression. As with all menus, use the arrow keys to navigate and the SET button make a selection.
Setting Compression on the G1
On the Canon PowerShot G1, set the compression through the menu. On the back of the camera, push the MENU button. The menu will be displayed in the LCD screen. Be sure the red Rec menu is highlighted. Then use the Omni Selector dial, the gray button with four arrows that’s on the back top right of the camera, to navigate through the menu. Press on the downward pointing arrow on the Omni Selector until the Compression settings line is highlighted. Then press the right or left arrows on the Omni Selector dial to move between and select one of the three icons that represent different settings:
- The first S setting (Superfine) – for the least compression (and hence the highest quality photos, but the fewest photos per card)
- The middle setting (Fine), which is recommended
- The last setting (Normal), which has the most compression (and hence the most possible photos per card, but of the lowest quality)
To retain your selection and leave the menu, press the MENU button again.
Setting Compression on the G5 and Pro 1
On the PowerShot G5 and Pro1, press the FUNC button and use the downward pointing arrow on the Omni Selector to scroll down to the second item from the bottom.
Then press the right or left arrows on the Omni Selector dial to move between and select one of the three icons that represent different settings. The compression options are the same as for the G1.
To retain your selection and leave the menu, press the FUNC button again.
Other Camera Modes
There are several camera “modes” you can use that determine how much thinking the camera should do for you. Most cameras offer a range of options from fully manual to fully automatic, and everything in between. These modes let you more control over the kinds of pictures you take with your camera, and let you make choices such as whether to use manual focus, exposure, close-ups, portaiture, and so on.
On the Canon cameras, you change these general settings by turning the main dial on the top right of the camera.
The settings fall into two general categories, or “zones.” The most basic mode is fully automatic. On most Canon cameras, automatic mode is marked by an “A” or the word “Auto.” On the Rebel, automatic mode is marked with a plain square icon. As you turn the main dial clockwise from automatic mode, where the icon graphics are, you’re using the camera in the Basic zone. As you turn the dial counter-clockwise from Automatic mode, you’re using the camera in the Creative zone. Basic zone settings do more of the setup work automatically, while Creative zone modes give you more control. Basic zone modes can also be thought of as “pre-sets” for specific combinations of focus and exposure tailored for certain shooting conditions.
The Mode Dial on the Canon Rebel. Modes to the left of the square icon (Automatic mode) are in the “Creative Zone,” while modes to the right of it are in the “Basic Zone.”
Basic Zone (Pre-Sets)
These pre-set options or modes are listed as you turn the dial clockwise from the auto setting. Various cameras have various combinations of these modes – your camera may not have some modes listed here.
- Pan Focus Mode – for shots with a lot of action where focusing is difficult. This sets the camera at the widest possible angle to try to keep everything in focus. This mode does not exist on the Rebel.
- Portrait Mode – Icon = a head in profile. Use this mode when you want a subject in the foreground in sharp focus.
- Landscape Mode – Icon = mountains. Use this mode when you want a wide-angle shot with the background in focus.
- Night Scene Mode – Icon = starry field. Use this mode when you’re shooting a subject at night. This setting illuminates the subject with the flash, while keeping the shutter open longer to provide more light for the background.
- Black and White Mode – Icon = a figure in contrast. Use this mode to take pictures in black and white (which is not recommended, as you can always take a color picture and covert it into black and white later using a photo editing program like Photoshop). This mode does not exist on the Rebel.
- Macro Mode – Icon = a flower. Use this mode for extreme close-up shots.
- Sports Mode – Icon = a running figure. Use this mode for shooting scenes with lots of motion, which you want to capture without blurring. This mode does not exist on earlier models of Canon cameras.
- Movie Mode – Icon = a movie camera. Use this mode to shoot low-resolution movies directly in the camera (note: no digital still camera in movie mode can come close to the movie quality you get with a digital video camera — consider this mode a novelty only.) This mode does not exist on the Rebel.
Consult the camera manual for additional help using the camera in these different modes.
Creative Zone (Manual Control)
Here are the options on the Canon cameras that give you more manual control over the camera settings, listed as you turn the Main Dial counter-clockwise from the auto setting:
P – Program – used for manual focus
Program mode is much like Automatic mode – the camera will still do most of the setup work for you — but it allows you to manually override some settings, such as focus, while the camera still automatically adjusts exposure. For example, you might want to manually adjust the focus if there’s an object in the foreground that the camera would automatically focus on, while you want to focus on something that’s more in the background.
Program mode is recommended for users who want good shots without thinking too hard about it, but require just a bit more control than is offered full Auto mode.
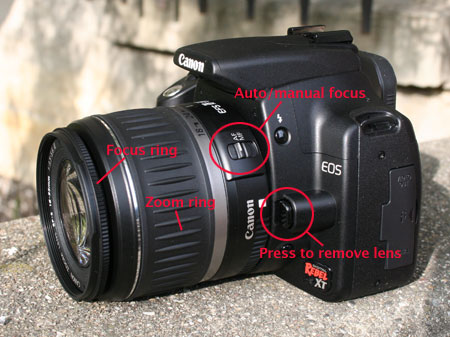
Rebel: To manually focus the Rebel, first look for the AF/MF switch at the top left of the lens body. Make sure it’s set to MF (manual focus). Then, with the camera in P mode, turn the outermost focus ring on the lens body while looking through the viewfinder.
G1 and G5: To manually focus the Canon G1 and G5 cameras, while in Program mode press the MF button on the camera.
On the Canon G1 you then adjust the focus by pressing the up and down arrows on the large Omni Selector button on the back top right of the camera.
On the Canon G5 you adjust the focus by turning the Main Dial on the top front right of the camera (in front of the shutter button).
To return to auto focus, press the MB button again.
TV – Shutter priority – used for manual shutter speed
This mode allows you to manually adjust the shutter speed, while the camera automatically adjusts the aperture. Remember: Exposure is a combination of exposure and shutter speed.
The shutter speed is how long the shutter remains open to record a digital image. If you decrease the shutter speed, the shutter remains open a longer period of time.
The shutter speed affects the clarity of images when you’re shooting something that’s in motion as well as the brightness/darkness of the photo (since a faster shutter speed lets in less light).
For example, you might want to manually set a faster shutter speed if you’re taking a picture of a fast-moving object. With a slower shutter speed, the object would appear blurry.
Rebel: On the Rebel you manually adjust the shutter speed in TV mode by spinning the plastic control dial just behind the shutter and watching the shutter speed indicator through the viewfinder. Spinning to the left gives you longer shutter speeds, spinning to the right gives you faster shutter speeds.
G1: On the Canon G1 camera you manually adjust the shutter speed in TV mode by pressing the left and right arrows on the large Omni Selector button on the back top right of the camera.
G5: On the Canon G5 you manually adjust the shutter speed in TV mode by turning the Main Dial on the top front right of the camera (in front of the shutter button).
The shutter speed you select will be shown in the LCD display – the higher the number the faster the shutter speed (most numbers are fractions of a second, while numbers with ” next to them are the slowest shutter speeds, measured in seconds).
Note: You also can manually adjust the focus while in TV mode – follow the same procedures described in Program mode above.
AV – Aperture priority – used for manual aperture
This allows you to manually adjust the aperture, while the camera automatically adjusts the shutter speed. Remember: Exposure is a combination of exposure and shutter speed.
The aperture is the size of the opening to the camera lens. It’s measured in “F stops,” ranging from F2 to F8, with F2 being the largest opening and F8 being the smallest. Many cameras have ranges that go lower than F2 and higher than F8 (on the Rebel, available aperture values depend on what lens is currently attached to the camera).
For example, if you’re taking a picture where there is little light, you might want to increase the aperture to let more light in and brighten the picture and increase the depth of field.
Rebel: On the Rebel you manually adjust the aperture value in AV mode by spinning the plastic control dial just behind the shutter and watching the aperture indicator through the viewfinder. Spinning to the left gives you wider apertures, spinning to the right gives you narrower apertures.
G1: On the Canon G1 camera you manually adjust the aperture in AV mode by pressing the left and right arrows on the large Omni Selector button on the back top right of the camera.
G5 and Pro 1: On the Canon G5 and Pro1, you manually adjust the aperture in AV mode by turning the Main Dial on the top front right of the camera (in front of the shutter button).
The aperture you select will be shown in the LCD display in F stops – the higher the F stop number the smaller the aperture and exposure.
Note: You also can manually adjust the focus while in AV mode – follow the same procedures described in Program mode above.
M – Manual – used for fully manual control
This allows you to manually adjust both shutter speed and aperture for the same shot, as well as focus.
In Manual mode, shutter speed and aperture are adjusted on all cameras described in the TV and AV sections above. In Manual mode, you are 100% responsible for these settings – the camera will not try to figure anything out for you.
You also can manually adjust the focus while in Manual mode – follow the same procedures described in Program mode above.
Flash
Most digital cameras come with a built-in flash. This usually can be set to fire automatically, in which case the camera will measure the lighting and engage the flash when you take a picture whenever the lighting level is too low.
Alternatively, you can set the flash to always go off, never togo off, or to go off in “Red Eye” mode, which fires a tiny pre-flash to let subjects’ eyes acclimate to the light, thus reducing the dreaded “red-eye” effect.
Rebel: In any of the Creative modes, press the lightning bolt icon button at the left of the camera body. The flash unit will pop up, and the flash will go off when the next shot is fired. To turn the flash off again, press the flash unit itself down until it snaps into position. The flash cannot be turned off when the camera is in any of the Basic modes.
PowerShot _cameras: Set the flash by pressing the small button on the top left of the back of the camera that’s marked with a tiny lightning bolt. As you press the button the options are displayed as icons in the upper left corner of the LCD screen. The options are:
- Lightning bolt icon with a tiny letter A for automatic flash
- Lightning bolt icon for always on flash
- Lightning bolt icon with a line through it for turning off the flash
If you find that your flash pictures come out too bright or too dark, you may want to manually adjust the flash intensity. This is especially relevant if you’re shooting objects that are fairly close to you, or relatively far away.
Rebel: Press the Menu button and navigate to Shooting Menu #2. Access the “Flash exp comp” (flash exposure compensation) and use the arrow keys to raise or lower the flash intensity.
PowerShot G1: Press the “WB” button on the camera back repeatedly, until the scale on the LCD shows a flash icon. Then press the omni selector left or right to adjust the flash intensity up or down. Press the Set button to accept the new setting.
PowerShot G5: Press the FUNC button on the camera back, then use the down arrow on the omni selector to scroll down to the flash entry. Now scroll left or right to adjust the flash intensity up or down. Press the SET button to accept the new setting.
Most cameras can also accept high-quality aftermarket flash units, which will provide more full and even illumination. Consult your camera’s documentation to see which flash unit to buy.
Playback
After you’ve taken some pictures, you can review what you shot and delete unwanted photos.
To do this, go into Playback mode on the camera, which will display your photos on the LCD screen. You can scroll through the pictures one at a time or display multiple images on a single screen. When you enter Playback mode, the last recorded picture will be displayed on the LCD screen, and you can use the left and right arrow keys (or the Omni Selector) to navigate through the collection of images on the CF card.
Rebel: Press the blue Playback button on the back of the camera. It’s marked with an arrow icon. The last image you shot will appear on the LCD. Press the Info button on the back of the camera to see a wealth of metadata about the current image (such as resolution, exposure settings, timestamp, etc.)
You can zoom in and out on an image by pressing the magnifying glass buttons at the top right back of the camera body, or pan over the image by using the arrow keys. As long as you are not in pan or zoom mode, you can press the blue checkboard icon button to view nine images at a time. Use the Jump button to skip forward nine images at a time. To get out of checkerboard mode and focus again on a single image, navigate to that image with the arrow keys and press the Play button again.
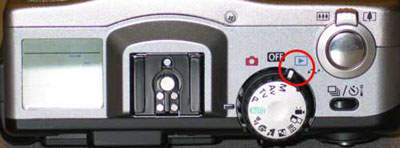
PowerShot G1: Go into playback mode by using the main dial on the top of the camera. Turn the outer ring of the dial from the on or off position to the blue playback icon arrow.
PowerShot G5 and Pro1: Go into playback mode via the small ring that surrounds the OFF button. Push your thumb on the small recessed button and slide the toggle from camera mode to playback mode.
You can view “metadata” (additional information) about the currently displayed image by pressing the DISPLAY button on the back of the camera at the bottom. To get more information on the particular photo, press the display button a second time.
To see the next image, use the “omni selector” — the gray or black button with four arrows that’s on the back of the camera on the top right.
You can display nine photos at a time by pressing the multi replay button on the back of the camera on the top left (it’s the same button that sets the flash when you’re in camera mode). This button looks like a small checkerboard. The multi replay mode will let you see your images as thumbnails, nine to a screen.
You again can use the left-right and up-down arrows on the omni selector button to scroll through the photos. And once you’ve selected a photo you want to view in more detail, press the multi replay button again to return to displaying a single picture on the screen.
Erasing Images
You can erase the images one at a time or all at once. Or you can simply reformat the flash card, wiping it clean.
To erase a single image while in playback mode, scroll to the image you want to delete, then press the button marked with a trashcan icon. At the prompt, use the right arrow of the omni-selector to scroll to OK and confirm you want to delete the image. Then press the SET button to delete the picture.
Rebel: To erase all images on the memory card at once, in playback mode press the Trashcan icon and use the arrow keys to navigate to “All.” Then navigate to “OK” and press SET to erase all images.
PowerShot: In playback mode, press the MENU button and navigate to the blue Play Menu. Then use the down arrow on the omni selector to scroll down to Erase all… Press SET, then confirm your decision by scrolling sideways to OK and pressing SET again.
You now can go back to camera mode and shoot more photos on the erased card.
Deleting Images As You Shoot
Since images appear on the LCD for two seconds as soon as they’re shot, you often know immediately when a shot hasn’t worked out and can be discarded. Press the Trash Can button (at the bottom left of the camera back on the Rebel) while the image is on screen and a confirmation dialog will appear. Press the right arrow key to select OK and then press the SET button. With a bit of practice, you can get very fast at this, and not have to worry about your CF card being filled up with poor images that you’ll have to weed out later. But be careful – because the LCD is small, sometimes you can’t see an image clearly enough to know that what you thought was garbage actually contained something you should have kept. Be judicious with what you delete.
Re-Formatting the CompactFlash Card
Reformatting the CF card has a similar effect to using the Erase All function, with one important difference: If you’ve used the same CF card in an audio recorder / player or other device, the “Erase All” function simply deletes the photos on the camera. Formatting the card wipes it entirely clean, including any non-camera data on the card. If a CF card starts to malfunction, reformatting will often restore it to full working condition.
Rebel: Access the Format option from the second Setup menu.
PowerShot: Press the MENU button and then scroll sideways to select the orange or yellow setup menu. Then scroll down to the Format… line.
With Format… highlighted, press SET and then confirm your decision by scrolling sideways to OK and press SET again.
You now can go into camera mode and take a new set of photos on the re-formatted card.
Downloading Images to a Computer
Images from a digital still camera can be transferred onto a computer in several ways.
Some cameras come with USB or FireWire cables you can connect directly to the computer. Alternatively, users can purchase an inexpensive “card reader” which attaches to the computer via USB or FireWire. If you have a card reader, you’ll need to turn off the camera, remove the memory card, and insert it into the card reader.
You can then transfer the images from the camera or the flash card reader using any of a number of photo management programs (which often come bundled with the camera). In many cases you simply use the computer’s file manager (such as Windows’ Explorer or OS X’s Finder) to drag image files directly from the CF card to the computer.
Macintosh computers running OS X come with a built-in application called iPhoto that makes it easy to transfer images to the computer.
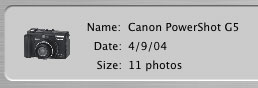
When a camera is connected to a Mac running OS X, iPhoto launches automatically, tells you the name of the connected camera, and how many images are on the memory card inside. Clicking the Import button at the lower right of the iPhoto window starts the import process. You’ll have the opportunity to tell iPhoto to delete images from the card after transfer, or to keep them. In most cases, you’ll want the images deleted.
In addition to handling image transfer, applications such as iPhoto allow you to sort, store, and catalog/database your images. Most offer basic image retouching capabilities such as red eye reduction, black and white or sepia conversion, image cropping, and rotation. Most also let you output your images in web-ready or email-ready format, burn backup CDs, generate simple web galleries, order prints, or even have glossy, cloth-bound books printed from an external service.
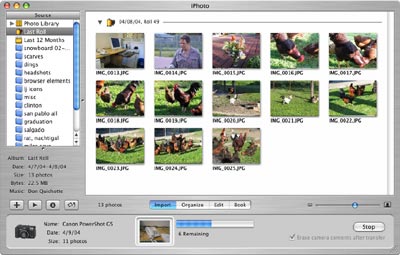
iPhoto for Mac OS X lets you transfer, sort, store, catalog, name, rotate, crop, and otherwise manipulate digital images. Click for larger version.
To get images out of iPhoto, drag their numbails to the Desktop or other Finder window. Alternatively, select individual images or an entire album and pull down File | Export to see a dialog that will let you resize images during export.
Default Settings
If you’re familiar with your camera’s options and settings, and you’re the sole user of the camera, you’ll probably want to leave all settings the way they are when you turn the camera off, so they’ll be set the same way when you use the camera again. However, if you share the camera with others, or if the camera is new/unfamiliar to you, you may want to reset the camera’s settings to its factory defaults. This way you’ll know you haven’t inadvertently inherited settings you or someone else made when they previously used the camera.
Canon Rebel Default Settings
Press the Menu button and navigate (with the Jump button) to Setup menu #2, then down to “Clear Settings.” You’ll get two sets of default options: One to clear settings and one to clear functions. Clearing the settings resets options such as ISO, image resolution and compression, drive and metering mode, and exposure compensation. Clearing the functions resets custom functions such as mirror lockup, exposure level increments, and auto-focus assist beam (these are items you might have set earlier through the Custom Functions menu item). To be sure you’ve reset the camera completely, clear both the settings and functions.
Canon PowerShot G5 and Pro1 Default Settings
On the Canon PowerShot G5 and Pro1 cameras, you can easily restore the factory default settings by pressing the Menu button on the back of the camera for 5 seconds or longer.
When you get the “Reset settings to default?” prompt, use the right arrow on the Omni Selector button to select OK. Then press the Set button to restore the default settings. Now all you need to do is change the resolution and compression settings. On the PowerShot G5 and Pro1, go into camera mode for taking pictures, and then set the resolution by pressing the FUNC button.
Use the Omni Selector to scroll down to the bottom entry in the list for resolution. Then press the right or left arrows on the Omni Selector dial to move between and select one of the four or five settings:
- M2 or M3 for 1024 x 768 (recommended)
And press the FUNC button again to save the setting.
Next set the compression by again pressing the FUNC button.
Use the Omni Selector to scroll down to the second entry from the bottom in the list for compression.
Then press the right or left arrows on the Omni Selector dial to move between and select one of the three settings:
- The middle setting (Fine), which is recommended
And press the FUNC button again to save the setting.
Finally, turn the Mode dial on the top of the camera until the word AUTO (in green) lines up with the black line to the left of the dial.
Now if you want, you can personalize the menu settings or switch to a manual mode of shooting.
Canon PowerShot G1 Default Settings
On the Canon PowerShot G1 there’s no simple way to reset all of the factory default settings. Instead you need to use the Menu to check all the settings for Record and Set Up.
To do this, first turn the outer ring of the dial on top of the camera from Off to the red camera icon.
Then press the Menu button on the back of the camera.
Use the down arrow on the Omni Selector dial to scroll down and select the items in the Record Menu. Then use the right and left arrows on the Omni Selector to scroll through and select a setting for each menu item.
Here are the recommended default settings for the Record Menu:
| MENU ITEM | SETTING |
| Resolution | M (1024 x 768) |
| Compression | Fine (middle setting) |
| File Format | JPEG |
| ISO Speed | 50 |
| Digital Zoom | Off |
| AF Mode | Continuous (although Single is also OK) |
| Review | 2 sec. |
| File No. Reset | Off |
| Contrast | |
| Sharpness | |
| Saturation |
Now use the up arrow on the Omni Selector dial to scroll to the very top above the the menu selections, and then use the right arrow to select the Set up Menu.
Use the down arrow on the Omni Selector dial to scroll down and select the items in the Set Up Menu. Then use the right and left arrows on the Omni Selector to scroll through and select a setting for each menu item.
Here are the recommended default settings for the Set Up Menu:
| MENU ITEM | SETTING |
| Beep | On |
| LCD Brightness | Normal |
| Shutter Volume (Shooting) | 2 |
| Speaker Volume (Replaying) | 3 |
| Auto Power Down | On |
| Date/Time | Set the correct date/time using the Omni Selector dial |
| Format | No setting needed – use this only to reformat a CF card |
| Language | English |
| Video System | NTSC (but this only matters if you’re using the camera for video) |
When you’re all done, press the Menu button again to preserve the settings.
Finally, turn the Mode dial on the top of the camera until the word AUTO (in green) lines up with the black line to the left of the dial.
Now if you want, you can personalize the menu settings or switch to a manual mode of shooting.
About this Tutorial
This digital still camera tutorial is based on lectures Mimi Chakarova gave in multimedia skills classes at the UC Berkeley Graduate School of Journalism. It was written by Paul Grabowicz and Scot Hacker.
Republishing Policy
This content may not be republished in print or digital form without express written permission from Berkeley Advanced Media Institute. Please see our Content Redistribution Policy.