To make a relief map using Blender, you’ll need to fist install a few tools. The first are some command line utilities in a package called Gdal. The easiest way to install these on a Mac is by first installing the homebrew package manager.
Install Homebrew (Mac)
You can see the instructions to install homebrew on their website. Or copy-and-paste the following command in your Terminal. This will require your computer password to complete the installation.
/usr/bin/ruby -e "$(curl -fsSL https://raw.githubusercontent.com/Homebrew/install/master/install)"
Note: this step may take a short while to complete.
Install Gdal Package
Once Homebrew is installed, you’ll need the GDal Package:
brew install gdal
Install Blender
You can install Blender from its website at: https://www.blender.org/download/.

Alternatively, you can also install Blender via homebrew.
brew cask install blender
Either way, you should also run this command in your Terminal to setup a alias that we will use later to export your hillshade relief image.
echo 'alias blender="/Applications/Blender/blender.app/Contents/MacOS/blender"' >> ~/.bash_profile
Then type:
source ~/.bash_profile
Install BlenderGIS Plugins
Blender is a 3D editing software, but we’re going to use it to do all sorts of things with cartography. In order to enable these features, we’ll install the BlenderGIS Plugin.
You can download the .zip file directly from this URL, which is hosted on the domlysz/BlenderGIS Github page.
Next, launch Blender, which should be in your Applications folder. (Some Mac software issues a security warning the first time you launch it. Click “Open” to continue.)
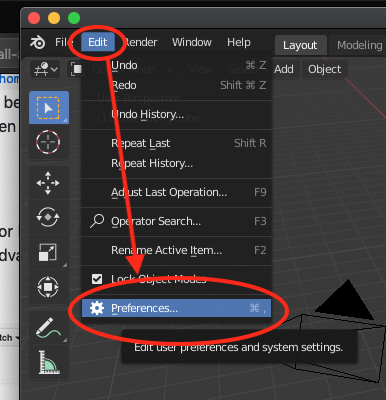
Once in Blender, go to the Edit menu and open Preferences.
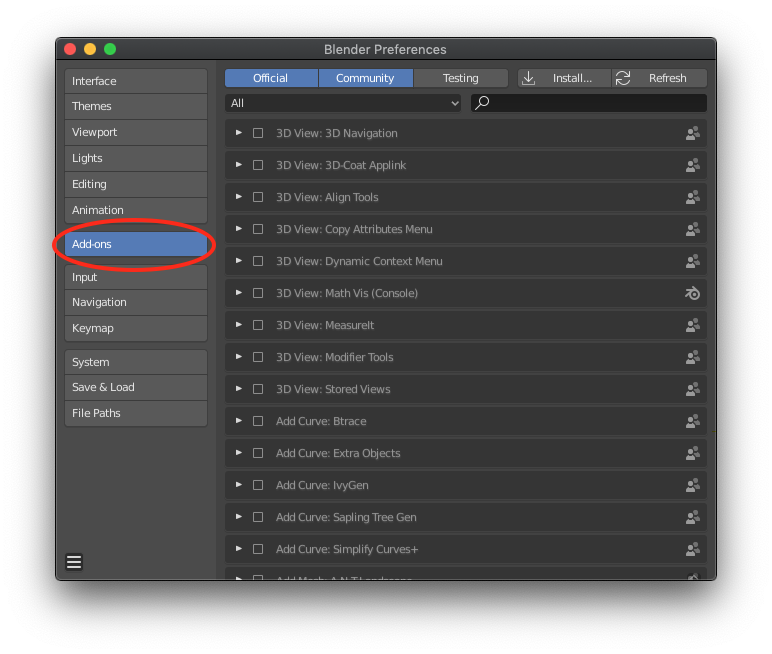
Next, click the add-ons tab.
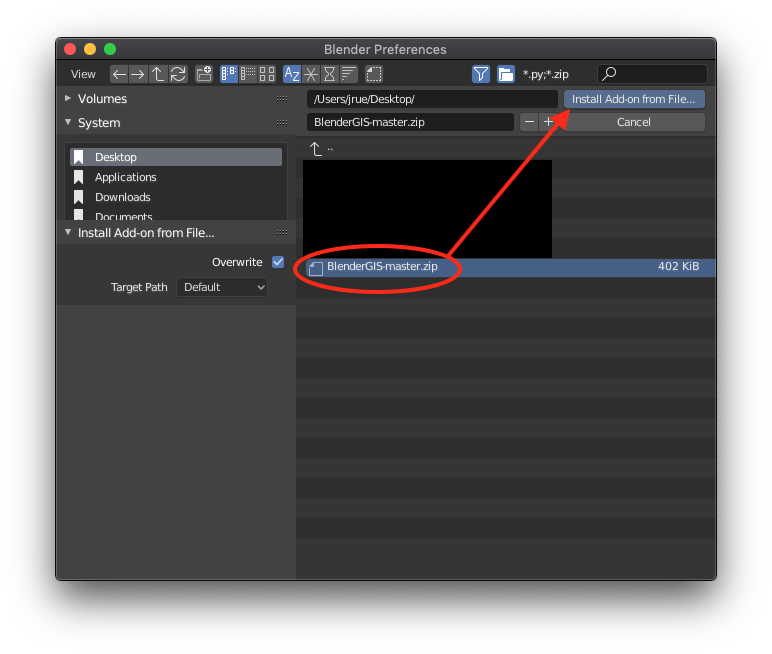
Next, navigate to the add-on .zip file you downloaded and install add-on file.
Next, check the small box to activate the add-on.

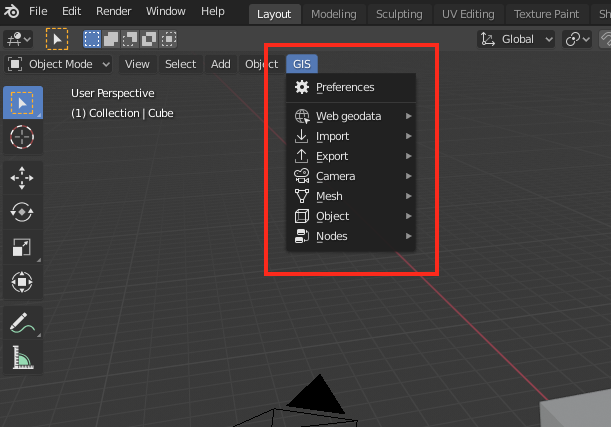
The GIS data can be found under a new GIS tab in Blender, which we’ll use later.
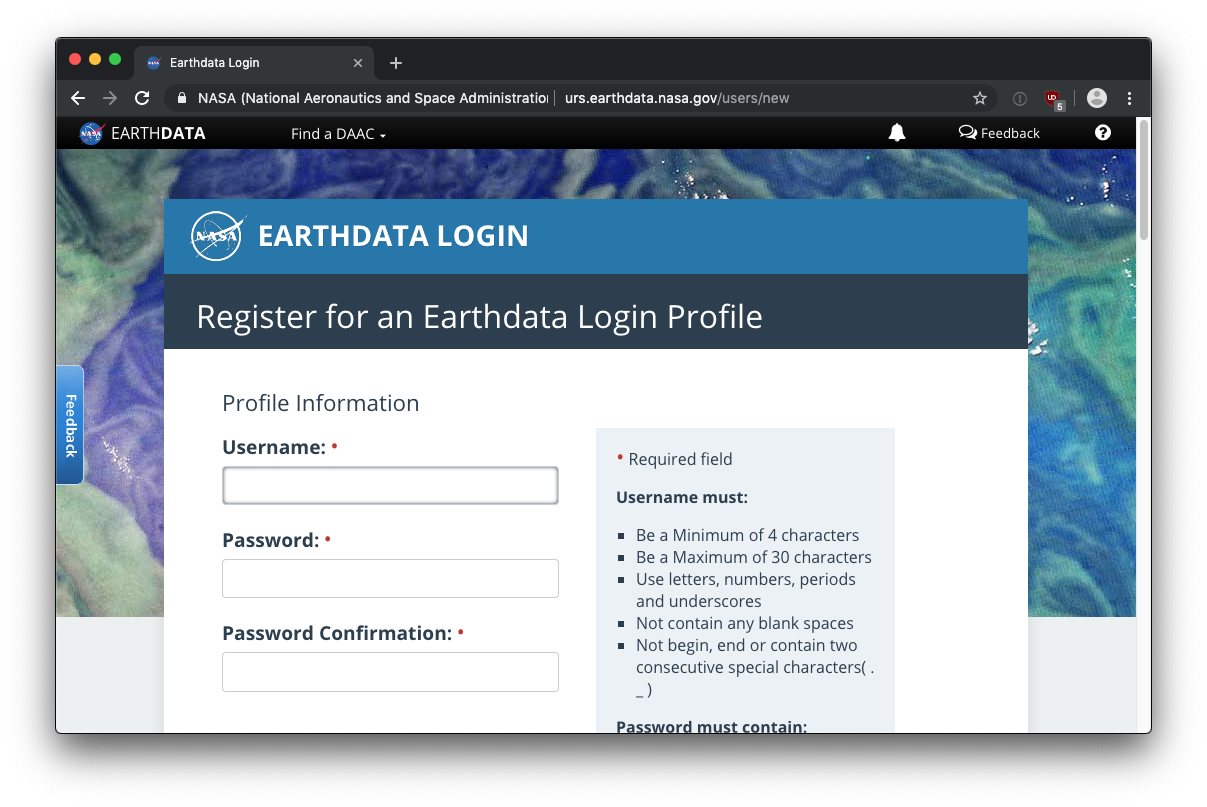
Create an account on NASA Earth Data
To download the map tiles you’ll need, create an account on NASA Earth Data.
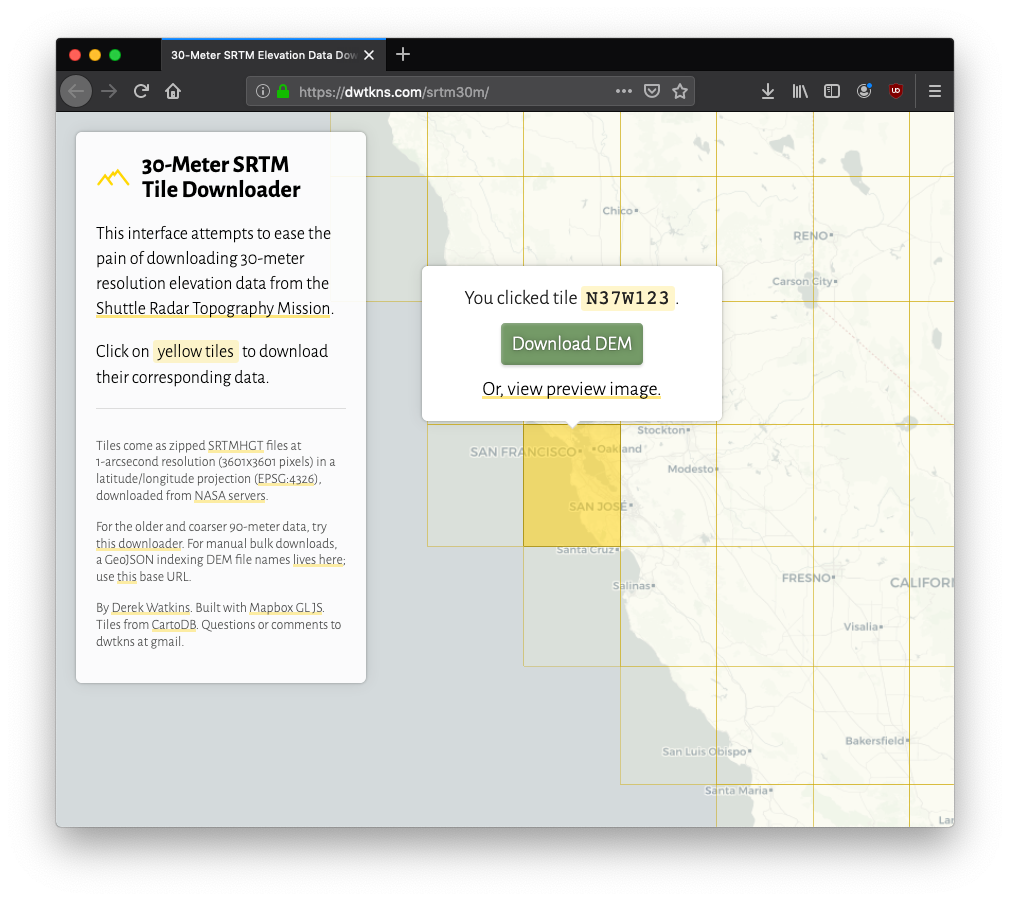
Downloading Earth Tiles
Derek Watkins at the New York Times runs a convenient website for downloading 30m tiles. You’ll need to be logged into your NASA Earth Data account to download them however.
Derek also runs a similar website for downloading larger 90m tiles over a wider region. The USGS site also runs a similar service for downloading NASA SRTM collections.
Prepping the SRTM Tiles for Blender
For this example, I downloaded tile N37W123.hgt, but you should swap out the file name for the one you have. When downloading from on of the above sources, you may have ended up with a zip file (unzip it first), or a .tif file, which will work as well.
In this first step, we use gdal_translate to convert to support floating point values, and convert to tif if it isn’t already in that format. The new file name will have _float appended.
gdal_translate -ot Float32 N37W123.hgt N37W123_float.tif
Next, we’ll reproject the file as ESPG:3857, which seems to work better with Blender.
gdalwarp -s_srs EPSG:4326 -t_srs EPSG:3857 N37W123_float.tif N37W123_reprojected.tif
(note: For sake of cleanliness, you can delete the original .hgt and _float files.)
When we import to Blender, it will strip out the world file data in our tif. So, this next step will save the TFW world file data in a separate file, and when we’re done with Blender, we’ll rejoin it.
gdalwarp -co "TFW=YES" N37W123_reprojected.tif deleteme.tif
The gdal_warp command will generate two files: deleteme.tif and deleteme.tfw. Delete the deleteme.tif but keep the .tfw to use with QGIS later on.
Making a Blender Map
1. Remove default cube
First, delete the default cube in the center of your workspace by clicking on it and pressing the delete button on your keyboard (rather than backspace).
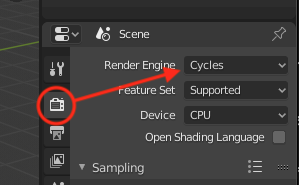
2. Use cycles render engine
Next, let’s change the a setting to use the cycles render engine by clicking the small Render Properties tab.
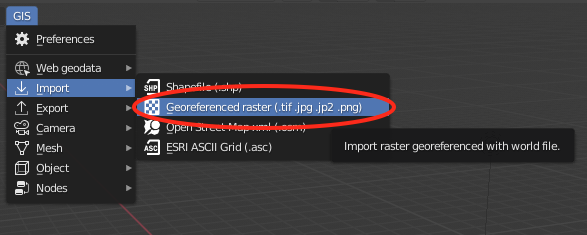
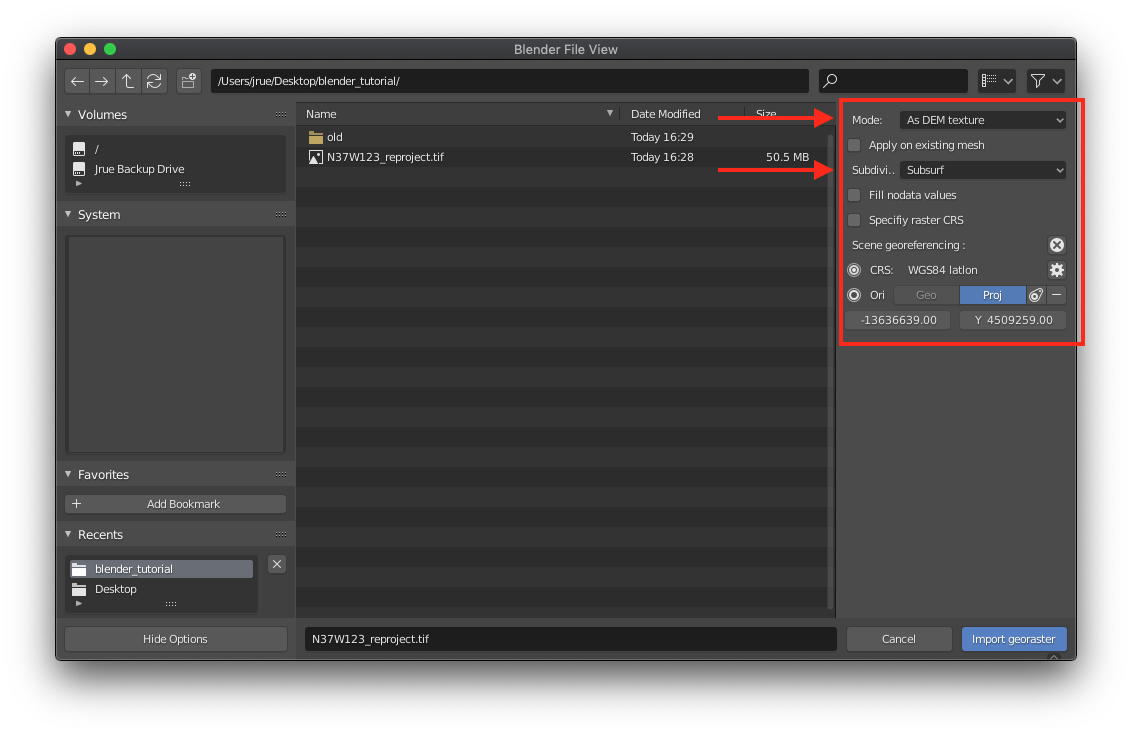
3. Import tif using georeferenced raster
Next, we’ll import our tif file. Go to our new GIS menu we installed from the add-on and select Georeferenced Raster.
Navigate to the file, but don’t double-click the file just yet. If you do, delete it and re-import it with the proper settings:
Mode: DEM Texture
Subdivision: Subsurf
4. Adjusting render setting
After importing, in your Modifier Properties set the Render setting to 11.

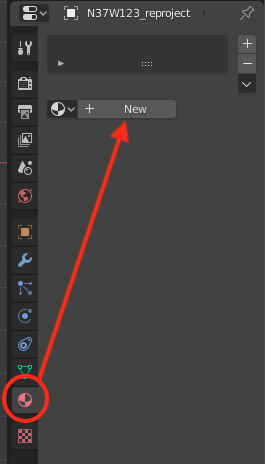
5. Add new material
Next, click on you Materials Properties and add a new material.
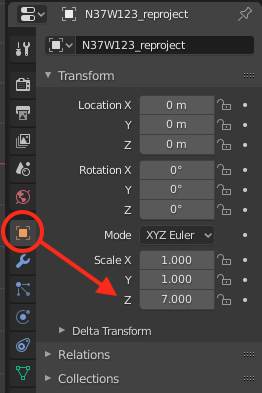
6. Adjust Z scale
Next, we’ll adjust the Z scaling, which represents the level of exaggeration in the elevation of our relief. This can be found in the Object Properties under transforms. Set your z scale to 7.
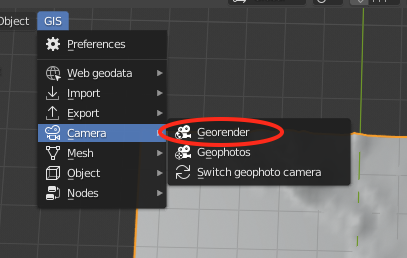
7. Setup georender dimensions
Next, under the GIS menu, select Camera and Georender.
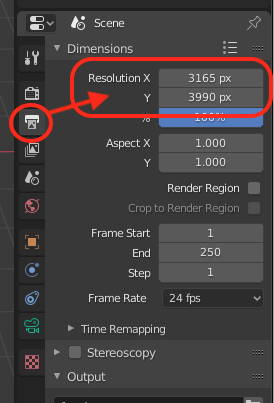
Outside of Blender, go to your Finder and click on the original .tif image file we had imported into Blender. Press Command + i to show information about the file. We’re looking for the file’s pixel dimensions, so we can setup our Blender export to match the pixels of the original file exactly.

Under the Output Properties panel in Blender, we’ll set the X and Y resolution to match the original file’s dimensions.
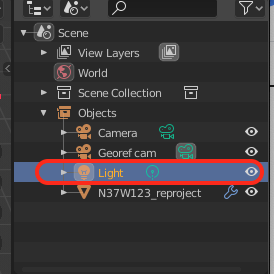
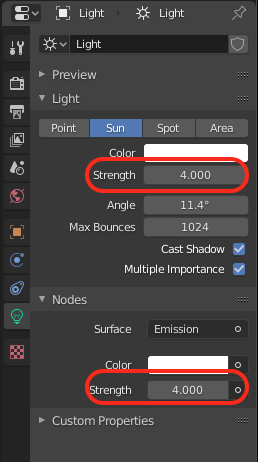
8. Setup sun light intensity and direction
Next, in the upper right-hand corder, expand the Object setting, and click Light.
In the Object Data Properties, change it to sun properties, and click on the use nodes button.
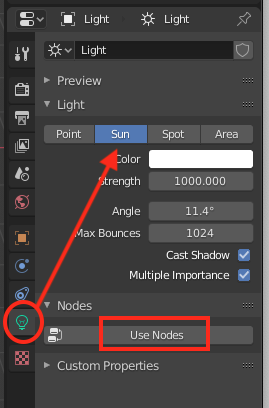
Set the strength to 4. You can optionally go to the Object Properties panel, and adjust the rotation of the sun’s location under the Transform section. Ideal settings for the sample relief were Rotation X=0, Y=40 and Z=112.5. The Y is the elevation of the sun and z is the azimuth, which is calculated counterclockwise from the East.
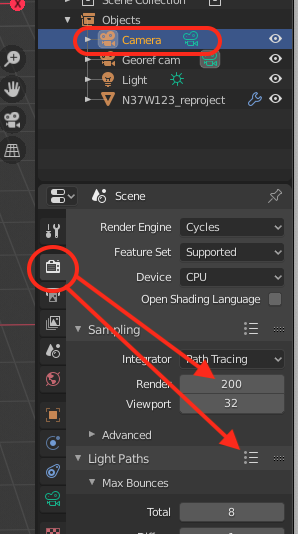
9. Setup final render setting
Next, we’re ready to render. In the upper right-hand side, click back on camera and click the Render Properties panel. Set the Render setting to 200. Then, click on the menu by Light Paths and select the option for “Limited Global Illumination” which will auto fill the preset settings. You can also check both reflective and refractive caustics for more realistic shading.
Exporting
Exporting is so much quicker using the command line rather that the GUI. Go to file and save as saving the file in the same project folder as the original tif. Save your file test.blend. Close Blender.
Next, using the command line in Terminal, navigate to the folder and run the following command. This command will create an output file called hillshade.tif, so don’t worry if it doesn’t exist just yet.
blender -b test.blend -o hillshade.tif -f TIFF -f 1
This will take a while to render. Once it’s complete, it will generate the hillshade file in your project folder. Remember the deleteme.tif? Change both deleteme.tfw file name and the output hillshade tif to hillshade. So now you should have two files: hillshade.tif (previously hillshade.tif0001.tif) and hillshade.tfw (previously deleteme.tfw). And now dump your hillshade.tif into qgis and reproject to your desire projection.
About this Tutorial
This tutorial was originally written by Jeremy C.F. Lin and recreated by Jeremy Rue.
Copyright UC Berkeley Graduate School of Journalism 2020. Any code samples in these tutorials are provided under the MIT License
The above copyright notice and this permission notice shall be included in all copies or substantial portions of the Software.
THIS PAGE IS PROVIDED “AS IS”, WITHOUT WARRANTY OF ANY KIND, EXPRESS OR IMPLIED, INCLUDING BUT NOT LIMITED TO THE WARRANTIES OF MERCHANTABILITY, FITNESS FOR A PARTICULAR PURPOSE AND NONINFRINGEMENT. IN NO EVENT SHALL THE AUTHORS OR COPYRIGHT HOLDERS BE LIABLE FOR ANY CLAIM, DAMAGES OR OTHER LIABILITY, WHETHER IN AN ACTION OF CONTRACT, TORT OR OTHERWISE, ARISING FROM, OUT OF OR IN CONNECTION WITH THE INFORMATION IN THIS PAGE OR THE USE OR OTHER DEALINGS IN THIS INFORMATION.