ProTools is a professional audio engineering software program made by Digidesign. Although it’s used by top-notch pros in the radio industry, ProTools has a fairly easy learning curve, making it just as good for beginners.
ProTools software comes paired with an Mbox, which is a separate hardware unit made by Digidesign that connects the source of your sound (like a minidisc player, microphone or DAT player) to your computer.
ProTools has versions for both the Apple and Windows platforms. This tutorial is written for the ProTools version used on Apple computers, but the Windows version of the software is very similar.
Opening ProTools
Launch the Pro Tools software program. Create a new session by selecting in the menu at the top:
File…New Session
Or use the Apple shortcut Cmd-M.
A new dialog box will pop up that looks like this:

Type in a name for your project and choose the location on your computer where you want to store your audio files (such as on a portable firewire drive).
Then select the following session options:
- Audio File Type – aiff
- Sample Rate – 44.1 kHz (unless you’re planning to use the audio in a video clip, in which cae choose 48 kHz, which is the standard for audio used in video)
- Bit Depth – 16 bit
- I/O Settings – stereo mix
Then click on the Save button to save your work.
And keep saving regularly by clicking on File…Save (or use the Apple shortcut for saving – Cmd-S), so you don’t lose any of your work if the computer crashes.
If you make a mistake, you can undo it by selecting Edit…Undo (or use the Apple shortcut for undoing – Cmd-Z). ProTools allows you to go back multiple steps and undo them.
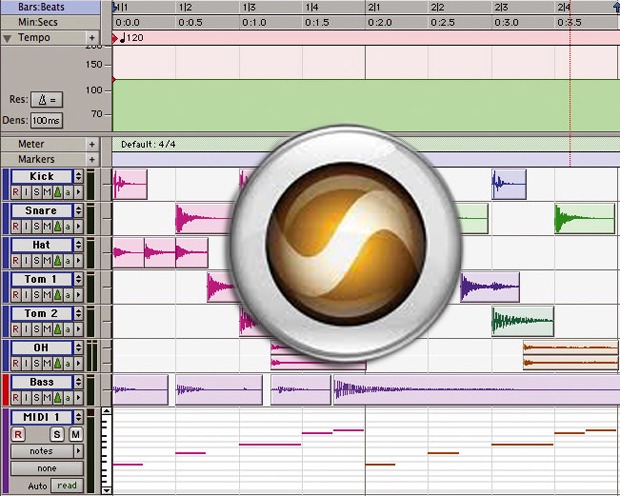
Elements of the ProTools Screen
The main ProTools screen is divided into several sections.
The open space in the middle of the screen is for laying audio tracks. With ProTools you can lay down many tracks, which you can then mix and fade between to produce your audio piece.
At the top of the screen is a timeline. It looks like this:

You can use the timeline to keep track of the overall length of your project or to know where you are at any given time in an audio piece.
To the right is the audio bin, which is where ProTools stores the raw audio files you’ve imported from a minidisc recorder, a CD, etc.
You’ll also see a box on the screen with buttons like you’d find on a cassette deck.
![]()
This is the transport panel, and is designed like old analog equipment to allow you a familiar way to navigate through your audio piece.
Connecting the Minidisc to the Mbox
The Mbox is a hardware device you use in conjunction with ProTools to download your audio from a minidisc recorder to your computer. You then open and edit the audio using the ProTools software.
The Mbox is connected to the computer via a USB cable.
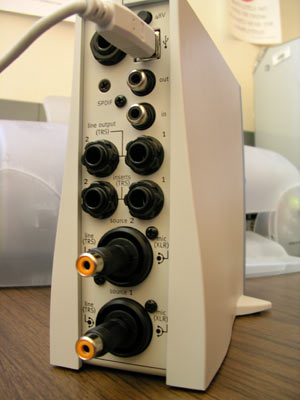
The back of the Mbox looks like this:
Connecting an Mbox to a Minidisc Recorder
To connect the Mbox to a minidisc recorder you need a 1/8 inch minijack to RCA audio cable (these cables usually come with the minidisc recorder).
You connect the 1/8 inch minijack end of the cable to the “headphones” or “audio out” plug on the minidisc recorder.
The two RCA audio male jacks on the other end of the cable connect to the Source plugs on the bottom back of the Mbox. You’ll need two 1/4 inch to RCA audio adapters, as depicted above, to plug your RCA audio prongs into the Mbox’s two Source plugs.
Connect the black prong on the RCA audio cable to the Source 1 socket.
Connect the red prong on the RCA audio cable to the Source 2 socket. (Tip: In the audio world RED is always the RIGHT channel, which is expressed as an EVEN number).
At the top of the back of the Mbox, make sure the tiny button labeled 48V is not pressed in (the 48V setting is for providing power to some microphones).
Now check the front of the Mbox. It looks like this:
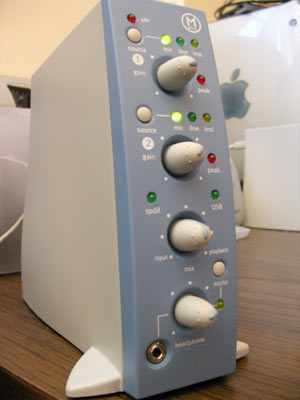
Locate the area at the top labeled Source 1, which has small button with a light just to the right of it. Press the small button and switch the input mode to Line setting.
Repeat this for the Source 2 area just below, pressing the small button and switching the input mode to Line.
The knobs in the Source 1 and 2 areas on the front of the Mbox adjust the volume levels of the audio going in to the computer from the minidisc recorder.
Use the Source 1 knob to adjust the volume of the left channel of audio (in the case of mono audio from a minidisc recorder, the Source 1 knob will control the audio from odd numbered tracks). Turn the knob clockwise to increase the volume of the inputted audio and counter-clockwise to decrease the volume.
Use the Source 2 knob to adjust the volume of the right channel of audio (in the case of mono audio from a minidisc recorder, the Source 2 knob will control the audio from even numbered tracks). Turn the knob clockwise to increase the volume of the inputted audio and counter-clockwise to decrease the volume.
Note – You should first adjust the audio output level from the minidisc to change the volume of the audio going into the computer. Then use the Source 1 and Source 2 knobs to fine tune the audio input levels.
Turn the Mix knob – the third knob down from the top – counterclockwise all the way to the input setting. Later, after you’ve imported the audio and want to edit it in Protools, you turn the Mix knob clockwise all the way to the playback setting.
If you’re inputting a mono source of audio, press the Mono button on the bottom right, just above the bottom knob, to turn on the yellow light.
Plug a set of headphones into the jack labeled headphones.
Use the bottom knob to adjust the volume of the audio you hear. This will not affect the volume level of the audio going from the minidisc recorder to the Mbox, just the level of the sound you hear in the headphones (use the Source 1 and Source 2 knobs to adjust the input sound level as described above).
Importing Audio from the Minidisc to ProTools
Once you have a minidisc recorder connected to your computer through an Mbox, use Pro Tools to create a new track of audio into which you’ll import the audio on your minidisc.
To do that, in the menu at the top select File…New Track.
In the dialog box select a new mono track. Type in a name for the track that describes the audio you’re importing, like “interview” followed by a persons name.
On the left side of the track you’ll see an R button, which stands for record mode. Click the button – the R will turn red.
On the computer screen, with the selector tool click once in the track you created at the point where you want the new audio to be located.
Turn on the minidisc recorder and begin playing back the audio on it. You should hear sound in your headphones and see the audio metering level on your track move up and down.
Monitor the audio to set the proper input level. Listen and look at the audio level meter on the left side of your track. The loudest audio level should bring the bar up around the M button. You should avoid having the audio level set so high that it drives the meter into the top red zone.
Adjust your audio input levels as needed. Do this by first changing the volume on the minidisc recorder, and then using the Source 1 and Source 2 knobs on the MBox.
On the minidisc recorder, use the playback controls to move through our tracks of recorded audio and “cue” the audio to where you want to begin recording.
To begin recording into Pro Tools, press Cmd-Spacebar.
Then start play on the minidisc recorder. You are now recording into Pro Tools. The waveform of sound will display on the track and the track will turn red.
To stop the recording process, press the space bar.
Be sure to save your work (Cmd-S).
To recording other audio tracks on your minidisc recorder into Pro Tools, again use the selector tool and click in the track in ProTools where you want the new audio to be located.
Repeat the recording procedures described above.
When you’ve finished recording your audio into ProTools, press the R button to exit the record mode.
Save your session.
Importing Audio from a Hard Drive Into ProTools
To the right side of the screen is the audio bin, where files are loaded and stored until you’re ready to use them in a track.
To load files into the audio bin, move your mouse to the words “audio bin.” Press the mouse button to reveal a series of options. Choose Import Audio.
In the Import Audio box, navigate to where your audio files are stored. Highlight the audio you want to add to your bin, and choose Copy Files. You should see your selected files appear in the “Regions Currently Chosen” box.
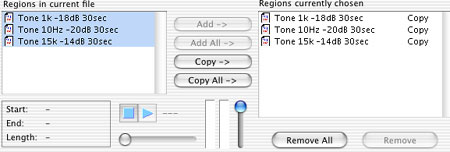
To add additional files, double click on the filename above and then click Add. Press the Done button when you’re finished.
Next a dialog box will appear asking where you’d like to save your files.
Choose the “Audio Files” folder.
You should now see a list of your audio files in the audio bin. You can now drag the files onto
new audio tracks to add them to your project.
Note: you can also import audio from a video clip in Final Cut Pro, to do more advanced editing of the audio in ProTools. See the section of the Final Cut Pro tutorial on Exporting to Pro Tools for Detailed Audio Editing.
Importing CD audio into ProTools
Put an audio CD into your drive. If your computer autoloads a player
program like iTunes or Winamp, be sure to close it before continuing.
Create a new stereo track. Name it something relevant like “music track.”
Open the audio bin. Select Import Audio and navigate to the CD location.
Open the CD and pick the track you’d like to import. Then convert the track and click Done.
ProTools will ask you where you’d like to save this audio information.
Choose the audio folder where your project files are located.
Then click GO.
Your new audio file will appear in the audio bin. Drag the file onto the
new stereo track to add it to your project.
Adding Tracks
Now that you have audio files ready, you need to create a track to put them into.
Click on File / New Track. A dialog box will appear asking what kind of track you’d like to create. Choose Mono Track if you’re working with audio like interviews or ambient sound. If you’re going to import a stereo recording, like a music CD, choose Stereo Tracks.
Now you’ll see that a new track has appeared in your workspace.

To bring audio into it, click and drag a filename from your audio bin into the track.
To play that piece of audio, activate the track by clicking on the new soundfile, then press the spacebar. As the audio plays, you’ll see the playhead on the track will begin to scroll along the waveform. To stop the audio, press the space bar again.
You’ll notice that there are several button options for each track. We’ll start by explaining some of the basic buttons.
“Audio 1” is the name of that track. To change it to something a little more relevant, click on the title once and type in a new name.
Below the title are three buttons. R for recording, S for soloing, and M for mute. Use the R button to record audio onto a track, the S button when you only want to hear audio on that specific track, and the M button to silence that track.
Basic Audio Editing Tools
Atop the timeline are several editing tool buttons. These are the key buttons you’ll use to assemble your audio project.
![]()
The tools are (from left to right):
- Zoomer, which looks like a magnifying glass and when selected lets you zoom in or out of your audio when you click on the track (to zoom in on a particular section of audio, select the Zoomer, click on a track, hold down your mouse button and drag to the left or right and release).
- Trimmer, which can be used to cut or add to the ends of your audio segments.
- Selector, which you use to select portions of your audio
- Grabber, a hand icon you use to move sections of your audio along the timeline
- Scrubber, a more advanced tool not used as often as the others
- Pencil, an advanced tool which can permanently delete audio (not recommended)
To the left of the edit tools are four arrow buttons with numbers below.

These are other ways to zoom into and out of your audio. Click the up arrow to the left to stretch out the wave peaks (this does not change the sound of your audio), or click the down arrow to the left to make the wave peaks flatter.
Click on the back arrow to the far left to make the audio tracks smaller. Click on the forward arrow to the far right to make the audio tracks bigger.
The numbered buttons are zoom presets – click 1 to see your whole project fill the screen, or 5 to get very deep into your project.
To the left of these buttons are the Edit Modes.
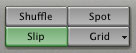
Shuffle and slip are the two you’ll deal most with.
When shuffle is activated, new audio clips you add to a track will butt up perfectly to the ends of your existing audio clips.
If you turn slip on, you can slide tracks anywhere you’d like along the timeline – they will not snap into place next to adjacent clips.
Try tinkering with your audio using the different buttons and editing modes.
Starting to Edit
The timer at the top of the screen marks the time of the audio track. Click about 10 seconds into your track. Notice the flashing line where you just clicked.
If you press return, the playhead will go back to the beginning of your piece.
Click the selector tool, and click just before the first bit of audio (you can tell where the sound is by looking at the patterns of the waveform.)
If you have extra sound at the beginning of your file that you want to trim off, click, hold and drag over the unwanted section.
Notice again the slip, shuffle and grid buttons above. The slip should be highlighted. Press the delete button and notice your selected audio has been deleted but nothing else in your track has moved. This is because you are in slip mode.
Undo this delete by pressing Cmd-Z.
Now click on shuffle in the upper-left hand corner and again hit the delete key. This time, the audio shuffles back to the beginning of the section you deleted.
Next, try clicking on the grabber (the hand icon) and dragging your audio around. Surprise, it doesn’t move! That’s because the slip key has to be active in order to “slip” your track along the timeline.
Making Regions
Regions are the different segments of a sound file in ProTools jargon.
To split an audio track into different regions, use the Selector tool and place the cursor wherever you want to split your track. You’ll see the blue markers above the timeline jump to the location you clicked.
Separate the track into regions by going to the menu at the top of the screen and selecting Edit…Separate Region. You can also use the shortcut Cmd-E.
Notice that your track now has two regions, like this:
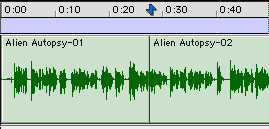
Double click on a region to highlight it. Now that the sections are divided form one another, you can move or delete them independently.
Editing Unwanted Sounds from Your Audio
Often you’ll find that your recordings are filled with undesirable pauses, ums and mouth noises. While breathing sounds are good to leave in, and make your speakers sound natural, more disturbing noises like lip-smacks should be edited out to make the sound cleaner. Do this by scanning your sound files and looking for little blips apart from the more solid, well-formed words. Listen to those sections. Is it a yucky mouth sound? Then delete it! Don’t forget to zoom into your project when you’re selecting audio to remove, so you can be very precise with your edits.
The goal is to have seamless editing, without any clicks or pops, so that someone listening won’t notice that it was fixed.
Creating a Stereo Track and Working in Stereo
Go to the file menu and create a new track, this time make it a STEREO TRACK. Name the track “music.”
Bring a stereo music file from your audio bin and into a stereo track on the timeline. You can know a track is in stereo by looking at its name in the audio bin. There will be a l and r below it.
Notice the track is split into two smaller sections, each representing a channel of stereo.
To Change the Volume of an Audio Track:
You may want to make one track of your audio play softer or louder than another.
To lower the volume of a certain track, go to the left of the screen, below the name of the track, where you’ll see a button labeled waveform.
Click and hold down this button to see several other options for that track, including volume. Select that.
When the volume option is selected, you will see a black line across your track. If you take the Grabber tool and click on the line, you can create an insertion point, which you then can drag up or down to create a higher or lower volume level from that point on in the track.
As you drag the point up or down, you’ll see the db or decibel level displayed, from 0 (for the highest volume) to -96 (for the lowest volume)
Create multiple insertion points along the line and drag the audio level line up or down at each to create fades or crescendos.
Thus if you click a point far away from the beginning of the track at a much lower point, you’ll create an angled black line going all the way down. This will do the same to your audio – creating a gradual fade.
To delete an insertion point, hold down the option key and click on that point.
To delete many points, pick the Selector tool, click on the track, hold down your mouse button and drag across your track. Then press the delete key on your keyboard.
This will delete all your insertion points (note that this will not delete your audio track, because we are in volume mode).
When you’re done adjusting the audio volume levels and want to return to editing, such as deleting or moving segments of a track, be sure to click on the button now labeled volume, and select waveform instead.
Setting Markers
You can add markers to your audio tracks to note a precise point at which you want to do an edit or to mark off a segment of audio you want to delete (by entering two markers to define the audio segment).
To set a marker, click on a point on your audio track and on the number pad to the right on our keyboard press the Enter key.
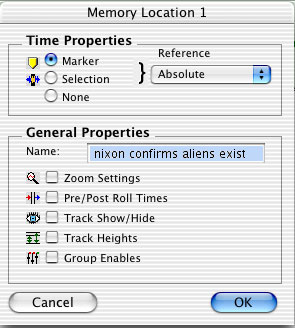
A dialog box will pop up with several marker options.
You can name your marker for future reference, then just accept the rest of the default settings and click on OK to set the marker.
A yellow marker will now appear over the track.

Once you’ve set a marker, you can move it to a different location in the Timeline by clicking on it and dragging it to a new point on the Timeline.
To modify a marker after making it, just double-click it.
That will give you access to the same dialog box options as when you first created it.
How to Select and Move Multiple Regions At Once
Selecting Multiple Regions
To select multiple regions of a track, first click on the Selector tool and then double click on a particular region to select it.
To select all the regions in the track at once, press Cmd-A (select all). You’ll see the highlighted region extend to cover the whole track.
To select particular regions, hold down the shift key and click on the individual regions you want to select.
Moving Multiple Regions
To move the regions you’ve selected, first make sure you’re in slip mode so you have the ability to shift the regions along the track.
Now choose the Grabber tool and then click on and slide the regions to where you want them on the track.
Exporting
Now that your sequence is edited, you’re ready to export your project out of ProTools and into a standard audio format – a process known in ProTools as “bounce to disk.”
You may want to export uncompressed audio for use on an audio or data CD, or you may want to export compressed audio for use on the Web. For Web work, you may want your audio as compressed QuickTime, or in the popular MP3 format.
Pro Tools’ “Bounce to Disk” function provides very limited options for conversion to other formats. We strongly recommend bouncing to uncompressed AIFF format, and then using QuickTime Pro or iTunes to convert the AIFF to another format.
First, make sure your Pro Tools project has been saved.
Then use the selector tool to select all the regions of your audio that you want to export (see the section on selecting multiple regions).
Then in the menu at the top click on File…Bounce to Disk.
In the top section of the Bounce panel, leave the Bounce Source unchanged.
Make sure the File Type is set to AIFF.
For web work, set the Format to Mono (summed).
For CD or other high-end work, set the Format to Stereo (interleaved).
Set the resolution to 16 bit.
Set the Sample Rate to 44100 (44.1KHz) unless you plan to integrate your audio back into a digital video project, in which case you should use 48000 (48KHz).
At the bottom of the panel, select:
Convert After Bounce
Click OK and select an output destination for your AIFF file. Click Save and your project will be exported to AIFF.
Preparing Audio for the Web
Once you have an uncompressed AIFF file, you need to compress it for web use. The goal is to retain decent audio quality while drastically reducing the size of the file — you should expect the web-ready audio to be 10x smaller than the original AIFF file (or more!).
This level of compression is achieved by discarding enough data that the file size is small, but not so much that the audio quality overtly suffers. For example, we’ll be reducing stereo tracks to mono, cutting the sample rate in half, and running the audio through a compression codec (compressor/decompressor).
The final product of this tutorial will be either a compressed audio-only QuickTime file or a standard MP3 file. Other common formats (not covered here) are Windows Media and Real Audio.
Note: if you’re planning to use the audio in a Flash project, there’s no need to compress it at this point, since the audio will be compressed by the Flash authoring tool when you do your final export from Flash. So if you’re going to use the audio in Flash, just use the AIFF audio file as described above.
Generating Compressed QuickTime Audio
The QuickTime player becomes “QuickTime Pro” when you register (pay for) the product. At that time, the QuickTime Player gains the ability to transcode between dozens of media formats.
Note: You can achieve similar results by importing the AIFF into iMovie or Final Cut Pro and then exporting, using the same principles shown here.
Launch QuickTime Pro and pull down File | Import. Navigate to the AIFF file you bounced from Pro Tools and click OK. Your AIFF file will load into QuickTime.
Pull down File | Export and navigate to an export location (such as the Desktop). Alter the output filename if you like (being sure to keep the .mov extension).
At the bottom of the file panel, in the Export section, select Movie to QuickTime Movie from the picklist, then click the Options button.
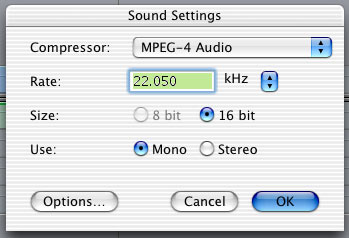
The Video section of the next panel will be dimmed out. In the Sound section, click the Settings button and select:
MPEG-4 Audio
22.050 KHz
16-bit mono
The panel should now look like this:
Click OK. The QuickTime export panel should now look like this:
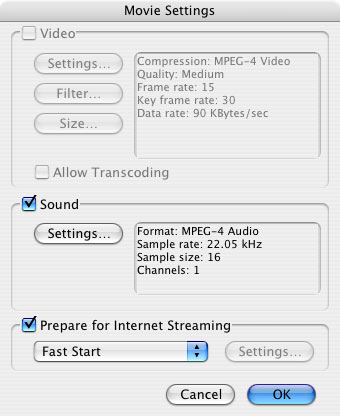
Be sure to enable “Prepare for Internet Streaming” and select “Fast Start” as the streaming type (unless your audio will live on a QuickTime Streaming Server rather than a regular web server, in which case you should selected “Hinted Streaming.”)
Click OK and the compression process will begin. This may take a few seconds or a few hours, depending on the length of your source file.
When compression has finished, compare the file size of the original AIFF to the file size of the exported audio file. Next, compare the audio quality of both by double-clicking them and listening to them carefully in your audio player of choice. If not satisfied, experiment with other options in the Settings panel above (but we have found these settings very satisfactory for general purposes).
To learn how to embed QuickTime audio into web pages, see the tutorial Adding Multimedia Elements to Web Pages.
Generating MP3 Audio
If you’d like to convert your audio to the ubiquitous MP3 format rather than QuickTime, note that neither QuickTime Pro, iMovie, nor Final Cut will allow you to do this. However, you can generate MP3s from within iTunes.
In iTunes, create a playlist by selecting File | New Playlist. Select the playlist and you’ll see that it’s empty (we only use an empty playlist here to keep your audio from getting lost in a larger collection of music).
Drag your AIFF file into the empty playlist window.
Next, you need to make sure iTunes is set to generate (encode) MP3s, and not some other format. Pull down iTunes | Preferences and select Importing. Make sure the “Import Using” picklist is set to MP3. Set the Setting picklist to 128kbps or 160kbps (again, you can adjust this up or down later according to your file size vs. quality needs — you might want to use a higher bitrate for high-fidelity music, or lower for spoken-word pieces). Click OK.
Select your AIFF file in the otherwise-empty playlist.
Pull down Advanced | Convert Selection to MP3. iTunes will churn for a minute as it converts your audio file. When it’s done, you’ll see another instance of the original track title in the playlist — one of them is the original AIFF file and the other is your MP3.
Drag the newly created MP3 file from iTunes to the Desktop. You can upload this MP3 file to any web server, link to it from any web page, etc.
Burning Audio and Data CDs
Before burning a CD, think carefully about whether you want to burn an audio or a data CD.
Burn an audio CD when you want a CD that can be played in any standard audio CD player, such as the one in your home or car stereo system, or in a “boombox.”
Burn a data CD when you want to store or transfer audio files that can be opened on a computer, moved to another computer, or worked on in an audio-editing application.
These instructions pertain to burning CDs with tools that are built into Mac OS X. Windows or Linux users will need to obtain separate audio and data CD burning software.
To Burn an Audio CD
To create an audio CD that can be played in any standard audio CD player:
1) Export your tracks from ProTools as AIFF or WAV files (i.e. “Bounce to disk”). Save them to a folder in a known location, such as the Desktop.
2) Launch iTunes from the Dock (if not on the Dock, you’ll find it in the Applications folder on your hard drive).
3) Click the “+” icon on the lower left side of iTunes to create a new playlist. Name the playlist whatever you like.
4) Drag your AIFF or WAV files into the playlist. Drag files up or down in the playlist to change their order. If necessary, adjust track volume or start and stop times by selecting a track and hitting Cmd-I (for Get Info), then selecting the Options tab.
5) Insert a blank CD
6) Make sure the playlist is selected — not a track or tracks — and click the Burn icon in the top right corner of iTunes. Burning will begin.
To Burn a Data CD
To create a data CD that can be read on either Macs or PCs:
1) Insert a blank CD. After a few moments, it will appear on the desktop.
2) If you like, rename the blank to something like “Audio Backup” (to rename a file or folder on the Mac, click its name and then wait a moment — the name will become editable). When the recipient of the CD inserts it into their computer, this is the name with which the disc will appear in their Finder or Explorer.
3) Drag your files or folders onto the blank CD icon.
4) When done, drag the CD icon to the trash. The trash icon will turn into a “burn” icon. The Mac will ask if you actually want to burn the CD at maximum speed. Click Burn and burning will begin.
Note: Test your burned CD on both a PC and a Mac before mailing to others!
Note: These instructions also work for data DVDs, but you need Mac OS X 10.3 (Panther) to create a DVD that will also work under Windows. If burned under 10.2, the DVD will be Mac-only.
About this Tutorial
This tutorial is based on lectures Robin Wise gave in multimedia skills classes at the UC Berkeley Graduate School of Journalism. It was written by Tim Gnatek and Scot Hacker.
Republishing Policy
This content may not be republished in print or digital form without express written permission from Berkeley Advanced Media Institute. Please see our Content Redistribution Policy.
© 2020 The Regents of the University of California